


The AutoGuide Headlight Restoration Kit Restore-Off
Unless you have some of those fancy and increasingly rare glass headlights, you will need a headlight restoration kit one day. As far as we know, 1997 was the last year any passenger vehicle in North America was sold with glass or sealed beam headlights, and plastic lenses have been mandated by both US and Canadian transportation agencies for decades. Plastic lenses have a lot of advantages besides the obvious one of not shattering on impact (or when a stone hits them): They let you replace ( or upgrade) just the bulb, and they’ve allowed designers to create complex shapes that not only look interesting (good or bad is in the eye of the beholder), but spread light better. And of course, they’re much lighter and less expensive, not that the cost savings gets reflected in an MSRP.
But grit, temperature, solar radiation, and compounds in the air (especially sulfur) degrade plastic headlights, both mechanically (blasting them with sand, grit, and debris), and chemically (yellowing through both photodegradation and chemical reactions). The result is faded, cloudy, and discolored or yellowed headlights. They don’t look very nice, and because it happens gradually, you might not notice that your headlights are getting dimmer, which is definitely a safety issue.
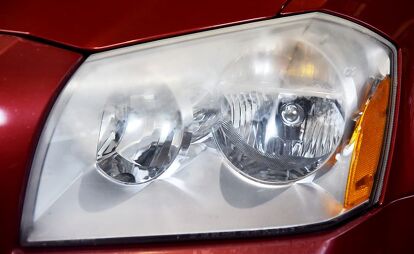
We’ve been increasingly aware of exactly this with the headlights of the 2005 Dodge Magnum RT project car in the AutoGuide Garage, which over the last two years have had cloudy discoloration moving down the lenses. We bought the top four best reviewed styles of headlight restoration kits sold on Amazon, got out the masking tape and cordless drill, and compared them head-to-head. We learned a lot, made a huge mess, hurt our hands, and even made a few friends along the way.*
*We did not actually make any friends, in fact people avoided us for the duration.
Table of contents
How We Tested Headlight Restoration Kits
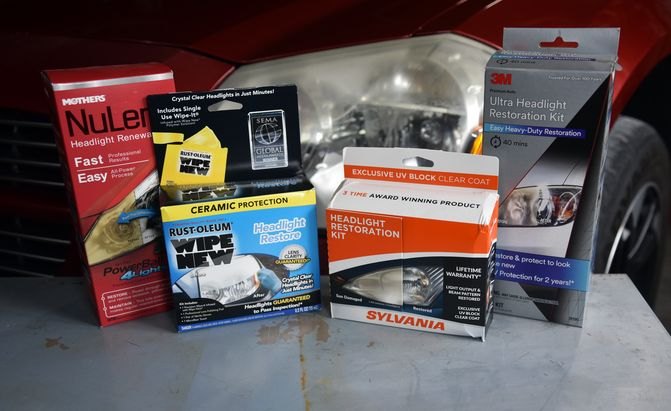
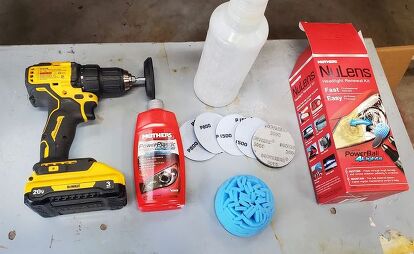
We purchased headlight restoration kits from Mothers, 3M, Sylvania, and Rust-Oleum, representing four different techniques, each the most popular one in their category. We masked off a headlight into four sections, and followed manufacturer's instructions so we could compare them literally side-by-side.
We then used the two we liked the best head-to-head the same way to figure out which one was best. We ended up with two very close to each other, a third place, and a clear (or not so clear) loser.
Don't Make Our Mistakes
Before we get into our headlight restoration kit test and results, we want to help you not make our bonehead mistakes. You are, of course, free to make your own all new ones.
Don't Mix Products
Sandpaper is sandpaper, and all the kits use it. You can absolutely mix and match, and run out to any auto parts or hardware store and get more if you run out. But the chemicals used in the final UV protectant included in one form or another in all the kits are not compatible, as we found out when we got the Rust-Oleum coating on other areas. It completely ruined our work. Fortunately, it wasn't permanent damage, but we did have to redo one side. With our other mistake we weren't quite so lucky.
Make Sure Your Headlights Are Clean
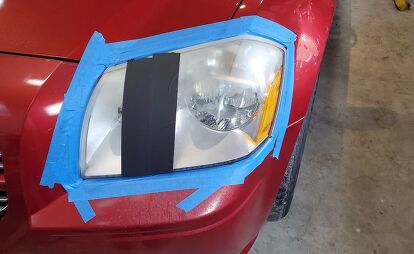
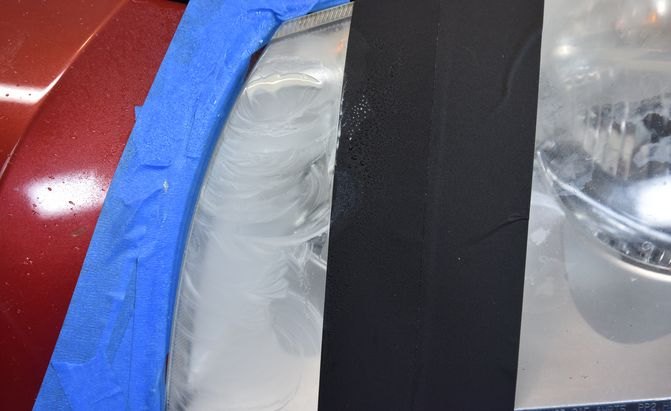
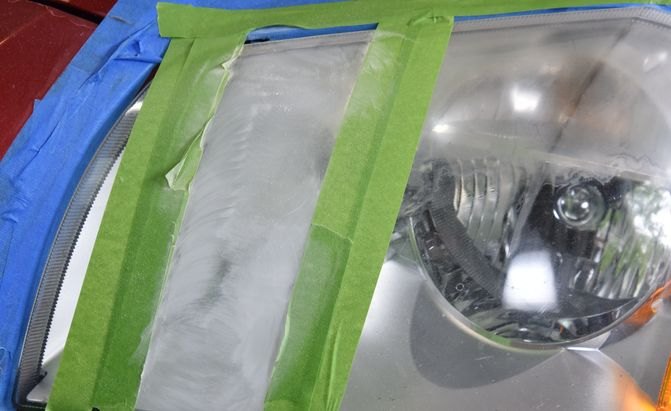
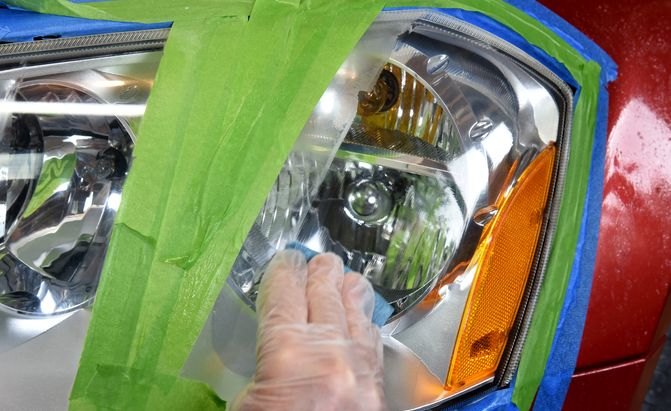
Ours were, but our problem came with how we masked them off. You need to use painter's tape (which 3M includes in it's kit) to protect the surrounding finish. We also masked off the lenses in sections so we could do them in quarters and get a good look at how the headlight restoration kits compared to each other. We thought it would be a good idea to use the same black gaffer tape (above) we use in the studio to hold up to the buffing, as it's much thicker than painter's tape and doesn't leave a residue.
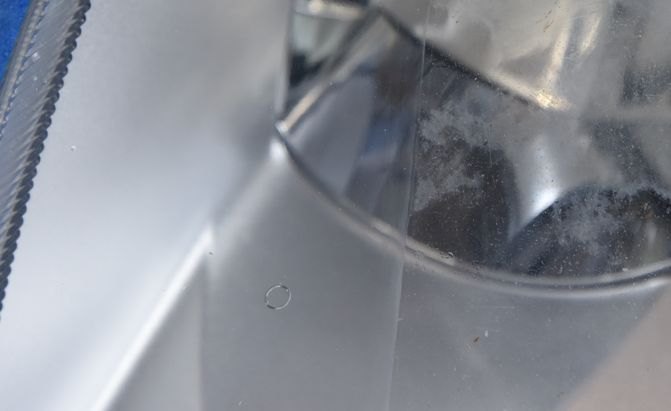
Unfortunately, we pulled a little piece of it into a sanding disc, which almost immediately heated it up and melted it into the lens. We managed to get it off with a lot of work, but it left a small, almost shattered looking patch that we were unable to remove. If you don't know it's there you'd have a hard time finding it and it could have been a lot worse, but we hate that it's there.
Before You Start
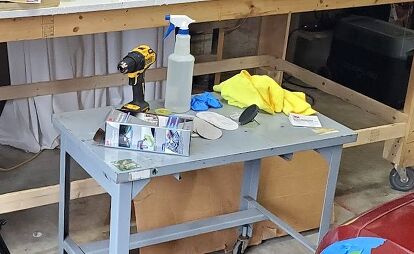
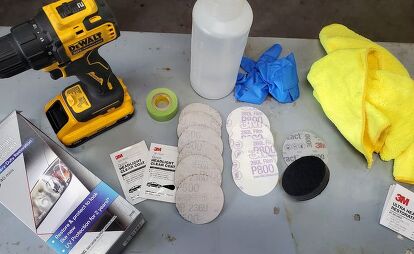
You don't need much for this project: Clean headlights, painter's tape, a spray bottle, dust mask, microfiber or cotton cloths, electric drill, and nitrile gloves. And you can substitute (a lot of) elbow grease for the drill, if you don't have one, or use one of the hand-sanding kits.
We washed the whole vehicle first to reduce the chances of contamination, and then cleaned the headlights again right before starting. No matter which kit you use, you're going to make dust, mud, or both during sanding, so be prepared for another round of cleanup when you're done, including both your car and garage, if you're working inside. This is a great project to do outside on an overcast (but not rainy!) day, but hot and sunny conditions will dry out the compounds too fast.
All of the kits that use a final UV coat require curing time before exposure to water. Read your instructions first to tell you how long, and plan on doing this in the evening to let them cure overnight, at least.
Head-to-Head (to head-to-head)
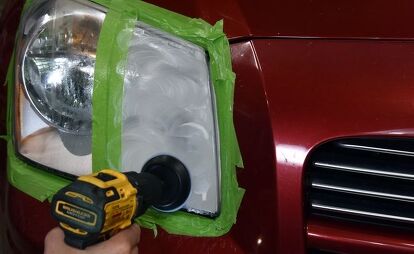
Mothers and 3M use a drill attachment and sanding discs, the main difference is that Mothers is wet sanding and 3M is dry sanding. Sylvania is a wet-sand process by hand with sheets of sandpaper; and Rust-Oleum uses a tiny two-sided sanding block which we hated. More on that below.
Mothers is the only kit that includes enough chemicals for more than one use, an eight-ounce bottle of Power Plastic 4Lights, which is a one-part polish and UV coat. The 3M and Rust-Oleum kits have one-time use wipes; and Sylvania has a spray, a sachet of rubbing compound, and vial of UV coat. Sylvania and 3M also included painter's tape, making them the only two we'd call a truly complete kit.
Mothers NuLens Headlight Renewal Kit
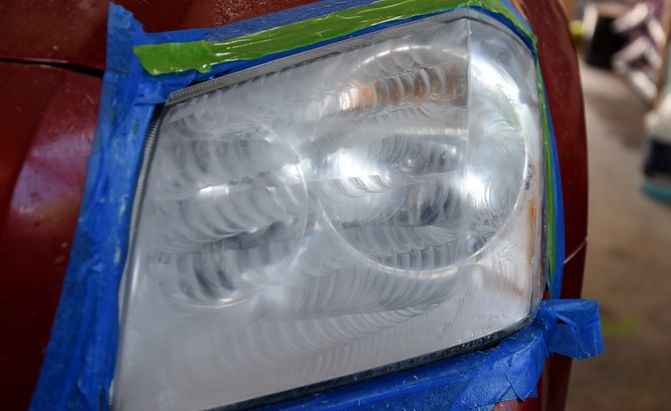
Mothers was the first headlight restoration kit we tried, and it set a high bar (although it was also the one we had an unrelated problem with, see Mistakes). You do the same basic thing with all of them: Sand with a relatively coarse sandpaper until the lens is evenly frosted over; then again with a finer grit or grits, then some mechanical and/or chemical process to leave you with a clear lens.
Mothers and 3M take the same approach, using a drill attachment and velcro-backed sanding discs, so you don't have to sand by hand.* Wet sanding, as with this kit (aside from the final 3,000-grit dry sand), is standard in automotive paintwork, and here helped to reduce friction, clear material away and, as we came to appreciate later, control dust.
It is a messy process, however, and it can be hard to see what's going on, but all you need to do is rinse it off with your spray bottle. The last step is using the liquid compound and buffing ball. The liquid had separated and took a lot of shaking, and while the instructions warned us to start off slow, we didn't go slow enough and flung compound everywhere.
Mothers doesn't have the same UV coating as the other brands, and says you need regular touchup to keep your headlights clear.
*It's tough to get right to the edges with a machine, so we ended up borrowing some sandpaper from the Sylvania kit for finish work.
Pros | Hex shank attachment lets you use lighter impact driver, wet sanding keeps dust down, enough compound included to touch up your lights dozens of times, no hazardous chemicals, only kit with no curing time |
Cons | Difficult to control buffing ball, wet sanding makes a different kind of mess, no tape included, needs regular maintenance, single 3,000-grit pad isn't very durable |
3M Ultra Headlight Restoration Kit
The 3M kit was recommended to us by a BMW M3 restorer (and organizer of E30 M3 SIGFest), so we had high expectations. The process is the same as Mothers, except here it's dry sanding until the final grit. That made it easier to see what we were doing, but also generated a lot of dust. We controlled that to an extent by spraying and drying regularly.
Aside from the dust (which we were relived to find is supposedly nontoxic), the other disadvantage to dry sanding is that the pads clogged up fast. Fortunately, there were a lot of them, and they held up just fine to being rinsed and dried. They removed material faster than Mothers, which would make this kit a good choice for deep scratches, but it's also easier to make mistakes.
3M's headlight restoration kit had a thicker, foam-backed drill attachment than Mothers, which conformed better to curves on the lens. However, it had a round shank, which meant it could only be used with a drill chuck. The Mothers attachment had a hex shank which popped into a much smaller and lighter impact driver, so on the other side of the car we ended up using the Mothers attachment with the 3M discs, as they're within millimeters of the same size.
The final step was wiping with a UV protectant clearcoat, which comes pre-applied on two pads, one for each side. The pads are small, covered with safety warnings, and require a specific wiping pattern. There is a one hour curing time, which is the shortest of the three that require curing, and 3M says the coating is good for two years.
Pros | Best overall results, better for deeper scratches, one hour curing time, easier to see what you're doing |
Cons | Round shank attachment only works with a drill, lots of dust, only two small wipes so no room for error |
Sylvania Headlight Restoration Kit

We didn't hate the Sylvania headlight restoration kit, but we sure didn't love it. It's a wet-sand kit, which we prefer, but it's just...sheets of sandpaper, which you fold into an uncomfortably small square and, you know, sand with. For a long time. It's not easy (although it's not like the Rust-Oleum kit), but it does have a few advantages. Unlike the machine sanding of Mother's or 3M, it's very hard to make a mistake, and if you run out of sandpaper, you can just get more—800 grit is 800 grit. Our Dodge's headlights are mercifully simple (if huge), but if you had a lot of complicated curves, you'd be able to conform to them much better this way.
Sylvania's kit has more steps than the others. There's an activator to spray on first, which helps not only to strip off old coatings, but soften the surface. You then wet sand by hand down to 2,000-grit, then squeeze some rubbing compound out onto a cloth and hand polish, then carefully drop some UV clearcoat out of a glass vial onto an included paper towel, and wipe in a specific pattern. The four- to six-hour cure time is annoying, but tolerable.
This kit had the best feel of any, and we could tell when the 2,000-grit paper had done its job and the lens got smooth. You apply rubbing compound for the final step with an included paper cloth, which was terrible. A sponge or microfiber applicator should be included.
Including something other than flimsy sheets for applying the rubbing compound and clearcoat would have changed the whole experience. The compound also wasn't a substitute for the 3,000-grit paper of other kits. Both together would have been excellent. We were still able to get a finish about on par with Mother's, but with a lot more work. If you need a hand sanding kit for headlights with a lot of curves and angles, go ahead and get this one, but pick up some applicator pads and a sheet of 3,000 grit, too.
Pros | Hand sanding is good for complicated curves, good feel, hard to make mistakes, rubbing compound is a good inclusion |
Cons | Only sands to 2,000-grit, a lot of work, can leave fine scratches, longer curing time, needs better quality components |
Rust-Oleum Wipe New Headlight Restore Kit
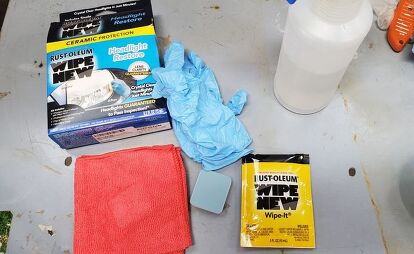
Rust-Oleum's headlight restoration kit uses a hard foam pad with different grits on each side, and it was easy to feel when we were getting the surface smooth. It's inexpensive, and the box is a pleasant blue color and doesn't take up much room on the shelf. It also comes with a small, thin microfiber towel and a pair of gloves.
That's everything good about it we could come up with.
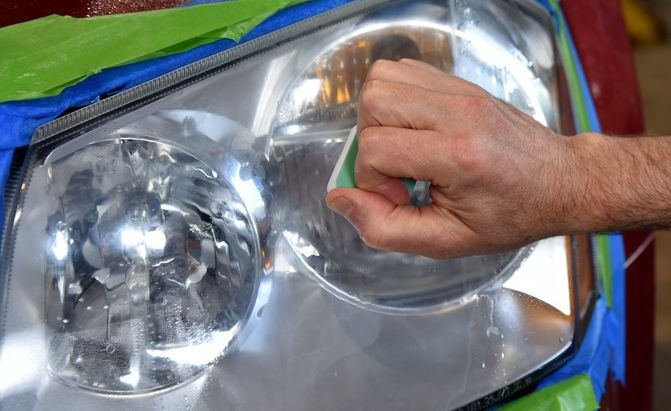
The worst part—and there was competition—was the tiny, stiff pad. It neither conformed to the curves of the headlight, nor our hand, and gave us trigger finger and cramps just on the 40-square-inch area we tested it on. We sanded and sprayed this small area for 15 minutes but at the end, we still left a visible transition between the previously clear and fogged lens areas.
The last step is to remove a drippy, frighteningly noxious pad from a pouch, and wipe on the eponymous Wipe New substance. Warnings included the potential for skin burns and fire, and the smell immediately convinced us to open the shop doors. It seemed to work as well as any of the other surface finishes, but it was compatible with none of them. Everywhere it overlapped with 3M on one side and Sylvania on the other, it discolored badly. None of the others interacted at all, and removing the assorted coatings, some of which were still soft, was a huge pain.
You probably could get decent results from the Wipe New Headlight Restore Kit, but to equal that of any of the others, it would take literally hours. If you had to restore some truly small area of plastic, like a side marker light, it might do OK.
Since we purchased our kit in late spring 2022, Rust-Oleum took their name off the Wipe New Headlight Restore Kit, and we're not surprised. We wouldn't want to be associated with it, either.
Pros | Good sanding feel, uses preferred wet sanding method |
Cons | Tiny. stiff pad was terrible to use, wipe was wet and drippy, 24-hour cure time, hazardous fumes |
Our Final Verdict
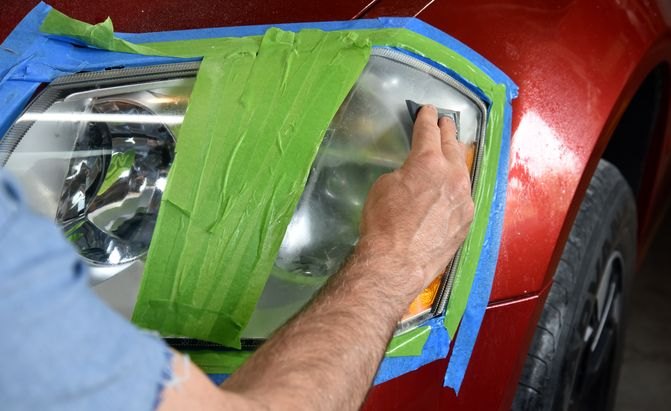
You can’t go wrong with either the Mothers or 3M headlight restoration kit. We got the best results from 3M and it's supposed to last for two years, but if we had to choose, we’d pick Mother’s wet sanding over the more difficult 3M dry sanding. We can’t think of a reason you couldn’t wet sand with the 3M kit, and we’ll give it a try the next time we can (we saved one of the two included wipes). Dry sanding definitely lets you see what you’re doing better, but the pads clog up quickly. You can rinse them, then they need drying time. Dry sanding with 3M’s 500-grit seemed to remove material faster than wet sanding with Mother’s 500-grit, but you can just rinse off the wet discs and keep going. Mothers is also the only one that doesn't use disposable wipes. Mothers is overall slightly more convenient and better thought-out, with a hex shank pad holder that you can use in an impact driver; reusable Powerball buffer; and 8.0-ounce bottle of plastic polish with short drying time. 3M definitely yields a better finish, but it’s close to Mother’s and you can't tell the difference from 10 feet away. [caption id="attachment_955192" align="aligncenter" width="671"] When we were done, we went over the other side again with 3M and this side with Mother's. Photo credit: David Traver Adolphus / AutoGuide.com.[/caption] The Sylvania kit worked great, but hand sanding with just a sheet of wet sandpaper was hard. If you have headlamps with a lot of complicated curves, it might be your best option, but be prepared for a long day’s work and sore hands. It wouldn't take much at all to make this a much better kit. We liked almost nothing the Rust-Oleum kit, aside from the ability to feel when the headlight started to get smooth. It had a tiny, rigid, and hard-to-hold pad; soaking noxious chemical wipe; 24-hour cure time, and gave us the worst results. It still worked and if you got one as a gift, you might as well use it, but if you have access to a power drill you should choose Mother's or 3M. Our ideal kit would use Mothers hex bit and wet sanding pads, 3M's applicator foam backing and a bottle of clear coat, Sylvania's rubbing compound and applicator pads, and nothing from Rust-Oleum. If you're out there making headlight restoration kits, give us a call when you put all this together.

After completing a degree project in automotive design, Dave wrote and photographed for almost a decade in print car magazines (remember those?), before transitioning to digital. He now subjects a series of old high-performance cars to the roads and weather in Vermont and wonders why they're always expensively broken. Please stop when you see him crawling under one on the side of the road.
More by David Traver Adolphus


Comments
Join the conversation
I've been doing headlight Restorations for 2 years now and I estimate over $1,700 approximately 2,000 cars I can tell you by far Rust-Oleum is the best kit clearly because of their clear coat pack that they give you in the kit so as long as you resurface the headlight properly the Rust-Oleum clear coat is by far the best
Crazy how Dodge uses the same low quality materials in its Viper and on the the Neon. But then again its a Dodge product so dont expect much.